Self-issued Identifier
From MgmtWiki
Contents
Full Title or Meme
When the Subject of an interchange is given the ability to create and manage their own Identifier and their own Identifier or Attribute Provider in support of those Identifiers and Attributes.
Context
- As a part of the effort to create OpenID Connect the option for the Subject to issue their own Identifiers was explicitly enabled.[1]
- Distributed ID is a somewhat different concept in that it envisions an identity which is broken into may pieces that are hosted by many different authorities and only brought together in a Relying Party upon User Consent. The impact of that is to allow the user's Attributes to be reference by the use with URLs that both point to the Attributes as a part of a Token that authorizes access by the Relying Party.
- The current common paradigm in open identity is for each conforming Relying Party to provide a list of Identifier or Attribute Providers that the User could chose from to allow access.
- If the input identifier for the discovery process contains the domain self-issued.me, dynamic discovery is not performed. Instead the following static values are used.
 {
  "authorization_endpoint":
    "openid:",
  "issuer":
    "https://self-issued.me",
  "scopes_supported":
    ["openid", "profile", "email", "address", "phone"],
  "response_types_supported":
    ["id_token"],
  "subject_types_supported":
    ["pairwise"],
  "id_token_signing_alg_values_supported":
    ["RS256"],
  "request_object_signing_alg_values_supported":
    ["none", "RS256"]
 }
- The certificate on https://self-issued.me/registration/1.0/ has been revoked, so that cannot be used for testing at this time.
Problems
- The big problem with any sort of Self-issued Identifier is Trust where there are no standards or examples of any trust without a history of trusted behavior.
- The big problem with the OpenID Connect flow for a Self-issued Identifier is that there is not validation of the request for user information.
Solutions
- Define the process of creating a DID URL for the Self-issued Identifier.
- Create resolver code that could be called by any sort of Universal Resolver or Trusted Resolver in the DID space.
- Build Native Apps using Native App URI Handlers for Android, IoS and Windows to act as Identifier or Attribute Providers.
- The Decentralized Identity Foundation has been created to enable "an open source decentralized identity ecosystem for people, organizations, apps, and devices". The have a list of areas of interest[2] that include block-chain and universal discovery which seem to be diametrically opposite of Privacy legislation like the GDPR and California Consumer Privacy Act of 2018.
- Nat Sakamura presentation on creating a Self-issued Identifier provider.
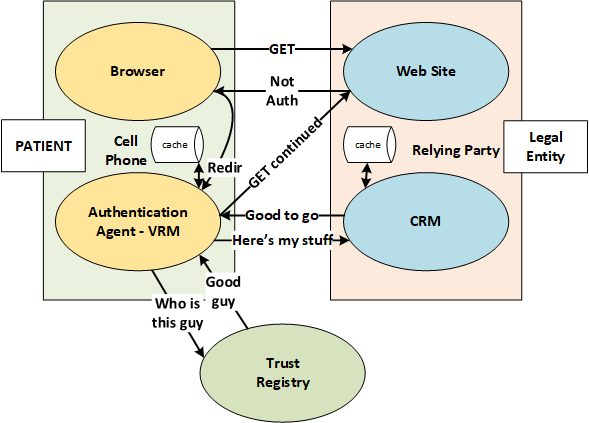
Example Control Flow
- GET - user navigates to a restricted resource
- Not Auth - the Relying Party does not recognize the user and responds with information about itself to the user together with the User Information (Scopes) that it needs.
- Redir - The browser recognizes the type of Identifier that was selected and redirects the request to a User Agent that can process the request.
- Who is this guy - The UA sends a request to an appropriate Trust Registry
- Good Guy - (cachable) If the RP is not known to the user agent, it requests data to be shown to the user.
- Here's my Stuff - If the user consents, the request information that is approved by the user is sent to the RP which gets the data in its Customer Relationship Manager (CRM).
- Good to Go (cachable) - The CRM recognizes the user (or perhaps asks the user for more information) and then sends the Authorization to the user (typically a cookie).
- GET (continued) - the user is now able to access the resource that was the reason for the original GET.
References
- ↑ Nat Sakamura +5, OpenID Connect - Part 5: Self Issued Provider 1.0 - draft 00. (2013-08-25) OpenID Foundation https://nat.sakimura.org/wp-content/uploads/2013/08/openid-connect-selfissued-1_0.html
- ↑ Decentralized Identity Foundation working groups http://identity.foundation/working-groups
